KatyTxCT5V
Seasoned Member
Hello everyone! **LONG POST AHEAD**
First off, I would like to thank @Rob for hosting this great forum") It would have been a lot harder for me to complete the entire CF1 & CF2 installations. The carbon fiber packages sure look great on the car!
It would have been a lot harder for me to complete the entire CF1 & CF2 installations. The carbon fiber packages sure look great on the car!
*Proceed at your own risk with any modifications, and have lots of patience!* Of course, at the end of every day, bourbon or wine
 helped me forget how this older man wasn't as flexible when I was younger.
I learned about the 5BW in July 2022 while on a business trip in Germany. When I returned to the States, I started my hunt by calling every dealer and receiving the same "sorry" message, already sold.
On Oct 31, 2022, I got lucky and found one available meeting most of what I wanted. I settled for a car without the CF1 & CF2 packages. I figured I could purchase and install everything afterward. Interestingly, when I checked parts.cadillac.com, all CF1 & CF2 pieces were available then! I decided to buy a little at a time, starting with the rear spoiler first, as it would immediately enhance the appearance. That was purchased on Nov 22 and installed on Dec 22. As more money became available, the other carbon fiber parts became out of stock. The hunt started. Slowly, I could find a piece here and there, and eventually, by Sept 24, 2024 (almost 2 yrs later), I had purchased everything needed for CF1 & CF2. I travel a lot for business, plus other distractions, but I started installing everything piece by piece when I could find time. The rockers/skirt ended up being last at the end of Dec 24, and oddly enough, not the hardest.
I wanted to share what I learned along the way, particularly on pieces where I couldn't find anything online for extra guidance. Thanks to @poor-sha for advising a site for factory manual downloads, acdelcotds.com. Of course, they lack installation detail, so between common sense and a couple of other forum members like @Sully, I finally have every CF1 and CF2 CF piece installed! I wanted to share my learnings. Read on if you are interested and if you want to spend money.
CF1 carbon fiber part numbers installed:
Rear Spoiler/Wing - 85561511 (There is a post about installing it on this forum, so there is no need to go into detail.)
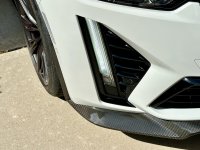
Front Splitter - 84432226 (There is a post about installing it on this forum, so there is no need to go into detail.)
Front Right Side Deflector - 84490400 (new #85070977)
Front Left Side Deflector - 84490401 (new #85070978)
(super simple installation with three screws for each side.)
Suggestion - To SAVE time in the future and not remove some items TWICE... If you plan to install the CF Front Grill Header (86788444) in the near future... when you remove the entire front bumper assembly, the same bottom front bumper fascia air deflectors (right, center & left) and left and right side deflectors (if you are installing the CF ones when installing the CF Front Splitter 84432226), wait until after the CF Front Grill Header is installed.
CF2 carbon fiber part numbers installed:
The total time taken was about 5 hours, including prep time. Be patient, as you will need it! If you plan to install a new front emblem, it's the perfect time to install it.
Front Grill Header - 86788444 You must pull the entire front bumper assembly off the car to install this small and cheapest carbon fiber piece.
After you pull off the entire front end, you have to pull apart other pieces/layers of parts from behind the front bumper assembly, as you must remove the front grill to install the upper CF header piece after removing the factory black one. If you can pull off the front tires, it would be faster to remove everything required. However, I did all the work with both front wheels on and the car on Race Ramps.
Starting Point/Removal Tips - A HELPER IS RECOMMENDED! Gather the factory manual sections for each online, as previously stated. Use paint masking tape around all the edges of painted surfaces to minimize potential damage from prying tools.
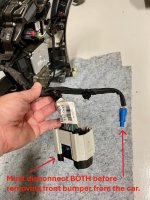
1.) Remove the Front Bumper Fascia Air Deflectors from under the front bumper (left, right & center pieces) using a Torx 15; 2.) Remove the Front Compartment Sight Shield (top by radiator area) held by thirteen plastic pull pins; 3.) Remove the right and left air deflectors from the front wheel well. There is also a screw that needs to be removed from the wheel liner around the 10'oclock position; 4.) Pull back the front wheel liner, and with a flashlight, locate a bolt that MUST be removed from both sides of the car. It takes a 7mm socket. It's at an angle, so use a "flexible style" extension with your ratchet; 5.) On top of the bumper fascia (top portion of the radiator area), remove six bolts with your 10mm socket; 6.) Remove the air filter housing assembly to help provide extra room to reach and separate a large electrical connector; 7.) As you start pulling outward on the bumper at the fender to separate, whichever side you start with first, when you get around the headlight area, four clips secure the bumper cover to the bottom of the headlight. These are difficult to get to release. I found that I could reach some with a long, skinny, flat-blade screwdriver from underneath and released two of the four. Then, pull to release the other two while pushing downwards using a small plastic pry tool. Don't continue until you release the opposite side by repeating the same process; 8.) Then, the large electrical connector on the right side fender well area under the airbox, (see pic attached) MUST be disconnected. It uses a cam-type release mechanism to rotate to release the two halves while squeezing two side tabs on the outer cover. Access to the electrical connector is easier through the front part of the fender well liner & top under the air filter housing area. Squeeze the outer tabs of the connector housing while rotating the handle; 9.) Disconnect a small blue electrical connector next to the larger one. Be aware you must pull out all the push-in mounting tabs that hold and support the wire harnesses; 10.) Remove the front bumper cover by pulling in the center section assembly and placing it on a blanket for protection; 11.) With the bumper cover upside down, disconnect the ambient air sensor behind the front bumper assembly and reposition the wire; 12.) Release retainer tabs, pull the energy absorber assembly, and remove it; 13.) Remove front camera and Adaptive Cruise Control (auto trans car) electrical connectors; 14.) To remove the front grill, remove four plastic clips and two screws from behind the grill. Separate grill from front bumper; 15.) Remove the plastic clips holding the upper grill header and separate from the grill; 16.) Install new CF Upper Grill Header, reusing plastic clips; 17.) Reverse all procedures for reassembly.
Rear Bumper Lower Fascia - 84981408 (old #) / 87825668 (new #)
**CAUTION - Please understand that MODIFICATIONS are required, including cutting into the energy absorbing area plastic behind the bumper in several areas to mount this CF piece onto an original NON-CF optioned car! Also, if you have the hands-free kick to open the trunk, you will lose the function BECAUSE the RF signals can't penetrate the carbon fiber! Otherwise, all components stay bolted/plugged in. You will still maintain the Cadillac lamp that shines to the ground. I will explain what I had to do, and all modifications are at your own risk, but everything is hidden and not seen after reassembly!**
The total time taken was about 7 hours, including prep time. Be patient, as you will need it!
RECOMMEND A HELPER, but I did it alone! Gather the factory manual sections for each online, as previously stated. Use paint masking tape around all the edges of painted surfaces to minimize potential damage from prying tools.
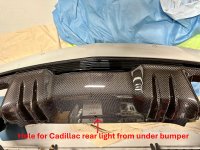
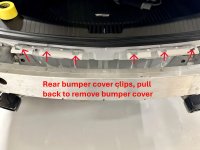
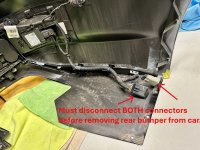
1.) Remove three screws (torx 15) from the rear side of the rear wheel liner on both sides of the car; 2.) From under the Rear Bumper Fascia, remove five Torx 15 screws from each side; 3.) Pull on the lower wheel liner to access four bolts. The upper bolt bolts the rear bumper cover and rear fender together. The lower bolt holds the bumper cover to the inner support; 4.) Remove seven lower Torx 15 screws across the bottom bumper fascia; 5.) Carefully start pulling on the bumper cover on the front side by the rear wheel liner (either side), and a small plastic pry tool might help release each tab working backward while pulling outward. Do the opposite side until the taillight area; 6.) There are three retainer clips around each inner area of each taillight. Access is limited, so hard pull is necessary. Do each side; 7.) Before removing the entire rear bumper cover, two electrical connectors (one black & one white) need to be disconnected on the lower left side; 8.) A few retainer clips are in the center area under the trunk opening (see the pic). It is a great time to have a helper as you pull backward to remove the rear bumper assembly; 9.) After removal, place upside down on a blanket for protection; 10.) Disconnect the electrical connector and remove four screws holding the reverse light assembly and remove; 11.) Remove the rear red reflector from each side by pushing on the clip and save it for reassembly on the new CF piece; 12.) Using a plastic pry tool, release each tab of the old black rear bumper lower fascia around the rear bumper cover and separate; 13.) Install the new CF Rear Bumper Lower Fascia onto the upper painted rear bumper cover. To secure the two pieces together, you must install plastic clips GM part # 11547341. You can buy 50 pcs cheap on Amazon. I used ones from Rexka brand.
NON-CF optioned cars use a DIFFERENT Rear Bumper Upper Assembly, so MODIFICATIONS are REQUIRED! To secure and install these on six center section tabs/areas, three on each side (see pic, arrows in red), use a combination of diagonal cutting pliers, small electrical shear cutters, and a Dremel, as you must remove some of the plastic on one side to allow pushing in the plastic clips on to each carbon fiber tab. Use the CF tabs sticking up to guide how much you must cut out and remove. The plastic clips must slide in as horizontally as possible to prevent damage to the CF tabs.
14.) After all plastic clips are secure, reverse all the procedures to put it all back together and back on the car.
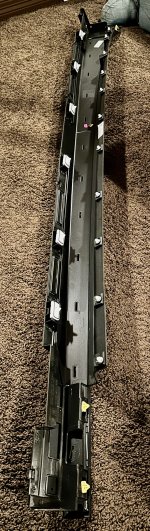
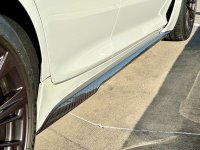
Left & Right Rocker Panel/Skirts - (R) 84965190 / (L) 84965189
The total time taken was about 9 hours, including prep time. Be patient, as you will need it!
First, @Sully has a current post to mount Anderson Composites CF skirts. Again, mine are OEM CF kits that include all the extra clips that will break during the removal of the rockers, and you will need to replace them most likely. I exchanged some messages with SULLY and figured out how to remove the rockers from each side using some of his ideas. I owe him credit for advising NOT to follow the factory manual pictures to remove them! Thanks, SULLY, for sharing your ideas! I agree, what a pain in the ass to knock these out!
You WILL NEED to gain some ground clearance (at least on the front of the car); I used my Race Ramps. Because you will be working around the normal pinch weld lift areas, you must lift the car by the wheels. There may be another way to lift, but I am sticking to what I know. I used my 67" Race Ramps on the front wheels and left the rear wheels on the ground. I noticed SULLY used 7" Race Ramp Cribs under each wheel to gain the height needed. I did these alone, but a helper doesn't hurt. Use paint masking tape around all the edges of painted surfaces to minimize potential damage from prying tools and on both bottom front door edges.
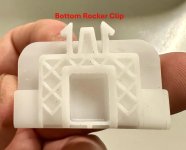
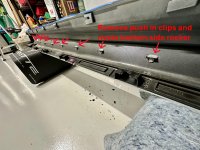
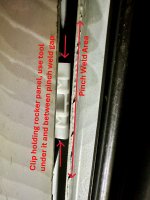
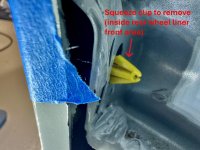
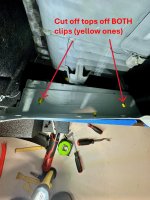
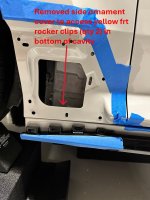
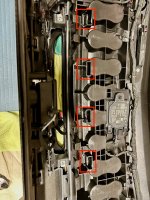
1.) Remove the Rocker Panel Protector cover (rear of each front wheel liner, held by two Torx 15 screws; 2.) Remove the Front Fender Ornamentation Vent. Retainer clips hold it in place and are a major pain to remove. TIP - I removed some extra screws from the wheel liner as I was able to reach via the backside by squeezing the clips to get the upper ones to release. Then, as I pulled it away slowly, I could see the others pushing and releasing them using pry tools; 3.) I used my small wire clippers to cut off the tops of the two yellow clips at the bottom of the lower access area (see the pic). Trust me, it will make life easier to destroy these now; 4.) On the rear of each rocker, there are four Torx 15 screws to remove from the bottom side. Also, remove a plastic push pin on the front side of the rear wheel liner; 5.) I used Sully's method of starting with the lower bottom clips. (see pic) You can push on the bottom of the rocker to gain an extra 1/8" of opening between the pinch weld area. I started at the rear of each rocker, using an angle door panel remover tool, working it between the rocker and pinch weld. Slide the cutout of the tooltip under the lower clip, then push on the tool handle. The clip is hard to remove, but it will, and in 90% of them, the portion that fits through the hole on the car breaks off. GM part # 11601845, and you can buy a pack of 10 on Amazon for less than $15 (you need 12. The OEM CF kit comes with these. (see pic, part # 11601845.) There are six of them to remove on each rocker/side. Bend down the lower rocker, and I used a pick to push in one end of the clip arms back side so they would release from the rocker. I then removed each of them entirely from the rocker (which makes life easier). Otherwise, they will attempt to snap back into the hole! 6.) Pull back the lower corner of the front portion of the rear wheel liner to expose one of the two yellow retainer clips that secure the upper rear rocker. (see pic). Starting at the back/rear of the rocker top, I squeezed the yellow clip (see pic) while pulling on the rocker. Once released, I used a plastic wedge pry tool to keep it separated. The next clip can be accessed from underneath using a long-body panel tool and repositioning the rocker panel. There are eleven of them. You can reach the next couple of them, and if you want to avoid potential damage to the top-painted edge of the rocker, release each one. I took a chance about 1/2 way down, and using a plastic pry tool and extra layers of tape on the top side, I could release the final ones leading up to the front door. The rocker will fall after the release of the last clip, so be prepared with blankets or protection for the bottom painted area; 7.) Because you will reuse the painted rocker, whether using OEM or Anderson CF skirts, you must remove the plastic clips and current rivets from the old black skirts. Instead of drilling out the old rivets, I used a pair of diagonal cutting dikes and cut off each inside. I used a pair of needle nose pliers to squeeze the remainder and then push the rest outwards; 8.) After you separate the pieces, I wipe the rocker-painted surface clean. Then, install the new CF skirt, secure using the plastic clips, and install new rivets. I removed any remaining broken clips on the rocker and installed all new clips; 9.) I started reinstallation by aligning the lower clips and pushing them upward. Then, I pushed in the upper clips from rear to front. After they all clipped back in, I reversed the removal process and wiped everything down.
DUE TO A MAX OF 10 IMAGES, SECOND POST WILL HAVE SOME MORE PICS.
GM retainer clips with part numbers recommended to have on hand are listed below. Most were found on Amazon much cheaper, as I prefer fresh new retainers for a tight fit.
1.) GM part # 11547341
Used on the front splitter, the upper header on the front grill, the rear lower diffuser, and both rocker panels.
2.) GM part # 11610700
Used on the front fender ornamentation vent upper, two per side.
3.) GM part # 11570602
Used on the front fender ornamentation vent lower, two per side.
4.) GM part # 11604723
Amazon doesn't officially list these. However, I purchased Rexka brand, 40 pcs Center Console Radio DVD dash Panel Switch Bezel Clip Body Trim Retainer shown for FORD & Dodge. They are orange and come in a pack of 40 for $8.99! They work perfectly. They are used on the front fender ornamentation vent, four for each side.
5.) GM Part # 11546635
Used on the rear upper rear rocker panel, two on each side.
6.) GM part # 11601845
Used on the rocker bottom, six per side.
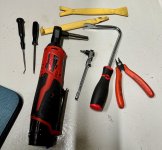
Tools that I used for both installations
Angled Door Panel Remover with square cutout
Long-Body Panel Tool with square cutout
Torx 15 bit
Small ratchet with hex head for Torx bit
1/4" drive power ratchet with hex head adapter for Torx bit
1/4" drive ratchet & 6" long flexible extension
7mm 1/4' drive socket
Straight and angle o-ring picks
plastic/nylon body pry bars
diagonal dike/cutter
small electrical cutter
1/2" painting masking tape rolls
Dremel with a cutting wheel (a multi-tool with a 3/8" wide blade may also help)
blankets to protect painted areas being worked on
I did my best to provide details from memory, so forgive me if I miss something or share if you find a better tool or solution.
I was recently asked why I didn't have a dealer install everything... well, there is only one dealer around here that I trust, and that is Sewell. I discussed this with their service manager, who said they would not install anything not bought through their parts department. Of course, their parts department couldn't compete with cheaper online OEM CF sellers and forum members. I'm glad I DIYed everything after the extra modifications were required for the rear bumper. I feel more intimate with my car now.
I spent just over $13k for all the OEM CF pieces with the deals I worked. Factory CF1 & CF2 option pricing is about the same.
Let me know if you have any questions. Good luck!!
First off, I would like to thank @Rob for hosting this great forum
It would have been a lot harder for me to complete the entire CF1 & CF2 installations. The carbon fiber packages sure look great on the car!*Proceed at your own risk with any modifications, and have lots of patience!* Of course, at the end of every day, bourbon
or winehelped me forget how this older man wasn't as flexible when I was younger.I learned about the 5BW in July 2022 while on a business trip in Germany. When I returned to the States, I started my hunt by calling every dealer and receiving the same "sorry" message, already sold.
On Oct 31, 2022, I got lucky and found one available meeting most of what I wanted. I settled for a car without the CF1 & CF2 packages. I figured I could purchase and install everything afterward. Interestingly, when I checked parts.cadillac.com, all CF1 & CF2 pieces were available then! I decided to buy a little at a time, starting with the rear spoiler first, as it would immediately enhance the appearance. That was purchased on Nov 22 and installed on Dec 22. As more money became available, the other carbon fiber parts became out of stock. The hunt started. Slowly, I could find a piece here and there, and eventually, by Sept 24, 2024 (almost 2 yrs later), I had purchased everything needed for CF1 & CF2. I travel a lot for business, plus other distractions, but I started installing everything piece by piece when I could find time. The rockers/skirt ended up being last at the end of Dec 24, and oddly enough, not the hardest.
I wanted to share what I learned along the way, particularly on pieces where I couldn't find anything online for extra guidance. Thanks to @poor-sha for advising a site for factory manual downloads, acdelcotds.com. Of course, they lack installation detail, so between common sense and a couple of other forum members like @Sully, I finally have every CF1 and CF2 CF piece installed! I wanted to share my learnings. Read on if you are interested and if you want to spend money.
CF1 carbon fiber part numbers installed:
Rear Spoiler/Wing - 85561511 (There is a post about installing it on this forum, so there is no need to go into detail.)
Front Splitter - 84432226 (There is a post about installing it on this forum, so there is no need to go into detail.)
Front Right Side Deflector - 84490400 (new #85070977)
Front Left Side Deflector - 84490401 (new #85070978)
(super simple installation with three screws for each side.)
Suggestion - To SAVE time in the future and not remove some items TWICE... If you plan to install the CF Front Grill Header (86788444) in the near future... when you remove the entire front bumper assembly, the same bottom front bumper fascia air deflectors (right, center & left) and left and right side deflectors (if you are installing the CF ones when installing the CF Front Splitter 84432226), wait until after the CF Front Grill Header is installed.
CF2 carbon fiber part numbers installed:
The total time taken was about 5 hours, including prep time. Be patient, as you will need it! If you plan to install a new front emblem, it's the perfect time to install it.
Front Grill Header - 86788444 You must pull the entire front bumper assembly off the car to install this small and cheapest carbon fiber piece.
After you pull off the entire front end, you have to pull apart other pieces/layers of parts from behind the front bumper assembly, as you must remove the front grill to install the upper CF header piece after removing the factory black one. If you can pull off the front tires, it would be faster to remove everything required. However, I did all the work with both front wheels on and the car on Race Ramps.
Starting Point/Removal Tips - A HELPER IS RECOMMENDED! Gather the factory manual sections for each online, as previously stated. Use paint masking tape around all the edges of painted surfaces to minimize potential damage from prying tools.
1.) Remove the Front Bumper Fascia Air Deflectors from under the front bumper (left, right & center pieces) using a Torx 15; 2.) Remove the Front Compartment Sight Shield (top by radiator area) held by thirteen plastic pull pins; 3.) Remove the right and left air deflectors from the front wheel well. There is also a screw that needs to be removed from the wheel liner around the 10'oclock position; 4.) Pull back the front wheel liner, and with a flashlight, locate a bolt that MUST be removed from both sides of the car. It takes a 7mm socket. It's at an angle, so use a "flexible style" extension with your ratchet; 5.) On top of the bumper fascia (top portion of the radiator area), remove six bolts with your 10mm socket; 6.) Remove the air filter housing assembly to help provide extra room to reach and separate a large electrical connector; 7.) As you start pulling outward on the bumper at the fender to separate, whichever side you start with first, when you get around the headlight area, four clips secure the bumper cover to the bottom of the headlight. These are difficult to get to release. I found that I could reach some with a long, skinny, flat-blade screwdriver from underneath and released two of the four. Then, pull to release the other two while pushing downwards using a small plastic pry tool. Don't continue until you release the opposite side by repeating the same process; 8.) Then, the large electrical connector on the right side fender well area under the airbox, (see pic attached) MUST be disconnected. It uses a cam-type release mechanism to rotate to release the two halves while squeezing two side tabs on the outer cover. Access to the electrical connector is easier through the front part of the fender well liner & top under the air filter housing area. Squeeze the outer tabs of the connector housing while rotating the handle; 9.) Disconnect a small blue electrical connector next to the larger one. Be aware you must pull out all the push-in mounting tabs that hold and support the wire harnesses; 10.) Remove the front bumper cover by pulling in the center section assembly and placing it on a blanket for protection; 11.) With the bumper cover upside down, disconnect the ambient air sensor behind the front bumper assembly and reposition the wire; 12.) Release retainer tabs, pull the energy absorber assembly, and remove it; 13.) Remove front camera and Adaptive Cruise Control (auto trans car) electrical connectors; 14.) To remove the front grill, remove four plastic clips and two screws from behind the grill. Separate grill from front bumper; 15.) Remove the plastic clips holding the upper grill header and separate from the grill; 16.) Install new CF Upper Grill Header, reusing plastic clips; 17.) Reverse all procedures for reassembly.
Rear Bumper Lower Fascia - 84981408 (old #) / 87825668 (new #)
**CAUTION - Please understand that MODIFICATIONS are required, including cutting into the energy absorbing area plastic behind the bumper in several areas to mount this CF piece onto an original NON-CF optioned car! Also, if you have the hands-free kick to open the trunk, you will lose the function BECAUSE the RF signals can't penetrate the carbon fiber! Otherwise, all components stay bolted/plugged in. You will still maintain the Cadillac lamp that shines to the ground. I will explain what I had to do, and all modifications are at your own risk, but everything is hidden and not seen after reassembly!**
The total time taken was about 7 hours, including prep time. Be patient, as you will need it!
RECOMMEND A HELPER, but I did it alone! Gather the factory manual sections for each online, as previously stated. Use paint masking tape around all the edges of painted surfaces to minimize potential damage from prying tools.
1.) Remove three screws (torx 15) from the rear side of the rear wheel liner on both sides of the car; 2.) From under the Rear Bumper Fascia, remove five Torx 15 screws from each side; 3.) Pull on the lower wheel liner to access four bolts. The upper bolt bolts the rear bumper cover and rear fender together. The lower bolt holds the bumper cover to the inner support; 4.) Remove seven lower Torx 15 screws across the bottom bumper fascia; 5.) Carefully start pulling on the bumper cover on the front side by the rear wheel liner (either side), and a small plastic pry tool might help release each tab working backward while pulling outward. Do the opposite side until the taillight area; 6.) There are three retainer clips around each inner area of each taillight. Access is limited, so hard pull is necessary. Do each side; 7.) Before removing the entire rear bumper cover, two electrical connectors (one black & one white) need to be disconnected on the lower left side; 8.) A few retainer clips are in the center area under the trunk opening (see the pic). It is a great time to have a helper as you pull backward to remove the rear bumper assembly; 9.) After removal, place upside down on a blanket for protection; 10.) Disconnect the electrical connector and remove four screws holding the reverse light assembly and remove; 11.) Remove the rear red reflector from each side by pushing on the clip and save it for reassembly on the new CF piece; 12.) Using a plastic pry tool, release each tab of the old black rear bumper lower fascia around the rear bumper cover and separate; 13.) Install the new CF Rear Bumper Lower Fascia onto the upper painted rear bumper cover. To secure the two pieces together, you must install plastic clips GM part # 11547341. You can buy 50 pcs cheap on Amazon. I used ones from Rexka brand.
NON-CF optioned cars use a DIFFERENT Rear Bumper Upper Assembly, so MODIFICATIONS are REQUIRED! To secure and install these on six center section tabs/areas, three on each side (see pic, arrows in red), use a combination of diagonal cutting pliers, small electrical shear cutters, and a Dremel, as you must remove some of the plastic on one side to allow pushing in the plastic clips on to each carbon fiber tab. Use the CF tabs sticking up to guide how much you must cut out and remove. The plastic clips must slide in as horizontally as possible to prevent damage to the CF tabs.
14.) After all plastic clips are secure, reverse all the procedures to put it all back together and back on the car.
Left & Right Rocker Panel/Skirts - (R) 84965190 / (L) 84965189
The total time taken was about 9 hours, including prep time. Be patient, as you will need it!
First, @Sully has a current post to mount Anderson Composites CF skirts. Again, mine are OEM CF kits that include all the extra clips that will break during the removal of the rockers, and you will need to replace them most likely. I exchanged some messages with SULLY and figured out how to remove the rockers from each side using some of his ideas. I owe him credit for advising NOT to follow the factory manual pictures to remove them! Thanks, SULLY, for sharing your ideas! I agree, what a pain in the ass to knock these out!
You WILL NEED to gain some ground clearance (at least on the front of the car); I used my Race Ramps. Because you will be working around the normal pinch weld lift areas, you must lift the car by the wheels. There may be another way to lift, but I am sticking to what I know. I used my 67" Race Ramps on the front wheels and left the rear wheels on the ground. I noticed SULLY used 7" Race Ramp Cribs under each wheel to gain the height needed. I did these alone, but a helper doesn't hurt. Use paint masking tape around all the edges of painted surfaces to minimize potential damage from prying tools and on both bottom front door edges.
1.) Remove the Rocker Panel Protector cover (rear of each front wheel liner, held by two Torx 15 screws; 2.) Remove the Front Fender Ornamentation Vent. Retainer clips hold it in place and are a major pain to remove. TIP - I removed some extra screws from the wheel liner as I was able to reach via the backside by squeezing the clips to get the upper ones to release. Then, as I pulled it away slowly, I could see the others pushing and releasing them using pry tools; 3.) I used my small wire clippers to cut off the tops of the two yellow clips at the bottom of the lower access area (see the pic). Trust me, it will make life easier to destroy these now; 4.) On the rear of each rocker, there are four Torx 15 screws to remove from the bottom side. Also, remove a plastic push pin on the front side of the rear wheel liner; 5.) I used Sully's method of starting with the lower bottom clips. (see pic) You can push on the bottom of the rocker to gain an extra 1/8" of opening between the pinch weld area. I started at the rear of each rocker, using an angle door panel remover tool, working it between the rocker and pinch weld. Slide the cutout of the tooltip under the lower clip, then push on the tool handle. The clip is hard to remove, but it will, and in 90% of them, the portion that fits through the hole on the car breaks off. GM part # 11601845, and you can buy a pack of 10 on Amazon for less than $15 (you need 12. The OEM CF kit comes with these. (see pic, part # 11601845.) There are six of them to remove on each rocker/side. Bend down the lower rocker, and I used a pick to push in one end of the clip arms back side so they would release from the rocker. I then removed each of them entirely from the rocker (which makes life easier). Otherwise, they will attempt to snap back into the hole! 6.) Pull back the lower corner of the front portion of the rear wheel liner to expose one of the two yellow retainer clips that secure the upper rear rocker. (see pic). Starting at the back/rear of the rocker top, I squeezed the yellow clip (see pic) while pulling on the rocker. Once released, I used a plastic wedge pry tool to keep it separated. The next clip can be accessed from underneath using a long-body panel tool and repositioning the rocker panel. There are eleven of them. You can reach the next couple of them, and if you want to avoid potential damage to the top-painted edge of the rocker, release each one. I took a chance about 1/2 way down, and using a plastic pry tool and extra layers of tape on the top side, I could release the final ones leading up to the front door. The rocker will fall after the release of the last clip, so be prepared with blankets or protection for the bottom painted area; 7.) Because you will reuse the painted rocker, whether using OEM or Anderson CF skirts, you must remove the plastic clips and current rivets from the old black skirts. Instead of drilling out the old rivets, I used a pair of diagonal cutting dikes and cut off each inside. I used a pair of needle nose pliers to squeeze the remainder and then push the rest outwards; 8.) After you separate the pieces, I wipe the rocker-painted surface clean. Then, install the new CF skirt, secure using the plastic clips, and install new rivets. I removed any remaining broken clips on the rocker and installed all new clips; 9.) I started reinstallation by aligning the lower clips and pushing them upward. Then, I pushed in the upper clips from rear to front. After they all clipped back in, I reversed the removal process and wiped everything down.
DUE TO A MAX OF 10 IMAGES, SECOND POST WILL HAVE SOME MORE PICS.
GM retainer clips with part numbers recommended to have on hand are listed below. Most were found on Amazon much cheaper, as I prefer fresh new retainers for a tight fit.
1.) GM part # 11547341
Used on the front splitter, the upper header on the front grill, the rear lower diffuser, and both rocker panels.
2.) GM part # 11610700
Used on the front fender ornamentation vent upper, two per side.
3.) GM part # 11570602
Used on the front fender ornamentation vent lower, two per side.
4.) GM part # 11604723
Amazon doesn't officially list these. However, I purchased Rexka brand, 40 pcs Center Console Radio DVD dash Panel Switch Bezel Clip Body Trim Retainer shown for FORD & Dodge. They are orange and come in a pack of 40 for $8.99! They work perfectly. They are used on the front fender ornamentation vent, four for each side.
5.) GM Part # 11546635
Used on the rear upper rear rocker panel, two on each side.
6.) GM part # 11601845
Used on the rocker bottom, six per side.
Tools that I used for both installations
Angled Door Panel Remover with square cutout
Long-Body Panel Tool with square cutout
Torx 15 bit
Small ratchet with hex head for Torx bit
1/4" drive power ratchet with hex head adapter for Torx bit
1/4" drive ratchet & 6" long flexible extension
7mm 1/4' drive socket
Straight and angle o-ring picks
plastic/nylon body pry bars
diagonal dike/cutter
small electrical cutter
1/2" painting masking tape rolls
Dremel with a cutting wheel (a multi-tool with a 3/8" wide blade may also help)
blankets to protect painted areas being worked on
I did my best to provide details from memory, so forgive me if I miss something or share if you find a better tool or solution.
I was recently asked why I didn't have a dealer install everything... well, there is only one dealer around here that I trust, and that is Sewell. I discussed this with their service manager, who said they would not install anything not bought through their parts department. Of course, their parts department couldn't compete with cheaper online OEM CF sellers and forum members. I'm glad I DIYed everything after the extra modifications were required for the rear bumper. I feel more intimate with my car now.
I spent just over $13k for all the OEM CF pieces with the deals I worked. Factory CF1 & CF2 option pricing is about the same.
Let me know if you have any questions. Good luck!!
Attachments
-
 IMG_FrtBumpElect.JPG1.3 MB · Views: 260
 -
 IMG_Some Tools.jpeg1.4 MB · Views: 265
 -
 IMG_PinchWeldRockClipArea.JPG929.2 KB · Views: 246
 -
 IMG_RearRockerClip.JPG1.1 MB · Views: 241
 -
 IMG_FrtRockerClips.JPG1.2 MB · Views: 241
 -
 IMG_AccessAreaOrnamentCover.jpeg.JPG860.4 KB · Views: 233
 -
 IMG_RearBumpModArea.jpeg3.3 MB · Views: 240
 -
 IMG_RearBumpCovLight.JPG2.1 MB · Views: 270
 -
 IMG_RearBumperClips.JPG814.9 KB · Views: 263
 -
 IMG_RearBumpElect.JPG1.9 MB · Views: 277